Table of Contents
- Does Time Machine restore MacOS?
- How do I restore my Macbook?
- How do I know if my Mac is backed up to iCloud?
- How do I access my iCloud backups?
- How do I get my data from iCloud?
- How do I download all my data from iCloud?
- How do I recover files?
- Can I restore my Mac to an earlier date without Time Machine?
- Should I restore from Time Machine or reinstall macOS?
- How long does it take to restore a Mac from Time Machine?
- How do I access backups on my Mac?
- How do you hard reset a MacBook pro?
- How do I restore a MacBook Air to factory settings?
- How do I reset my MacBook Pro 2015?
- How do I know if my MacBook Pro is backed up?
If you’ve backed up your Macbook Pro to iCloud, you can easily restore it from the backup. Here’s how to do it.
Does Time Machine restore MacOS?
Time Machine is an automatic backup mechanism for MacOS computers. It backs up data, applications, and the complete system to an external storage device automatically.
You may use Time Machine to restore files or even the complete MacOS system since it generates copies of your system.
In the event of a computer breakdown, virus infection, or human mistake, you may utilize Time Machine backup to restore lost time. It also enables you to retrieve all of the apps installed on your computer since the previous Time Machine backup. You may also specify which individual files and folders inside a backup you want to restore.
How do I restore my Macbook?
Restoring your Macbook Pro from an Apple iCloud backup is a straightforward procedure that will restore all of your personal data and programs.
To begin, open the App Store app on your Macbook Pro and search for the “Backup&Restore” app. After downloading, launch the program and choose ‘Restore from Backup‘. The list of accessible iCloud backups connected with your Apple ID will then be shown. Click the most current one that contains all of your personal information and apps, then select ‘Restore‘. Your MacBook Pro should now successfully restore to its original state.
Backup all of your vital data on a regular basis to avoid data loss during future upgrades or restores.
How do I know if my Mac is backed up to iCloud?
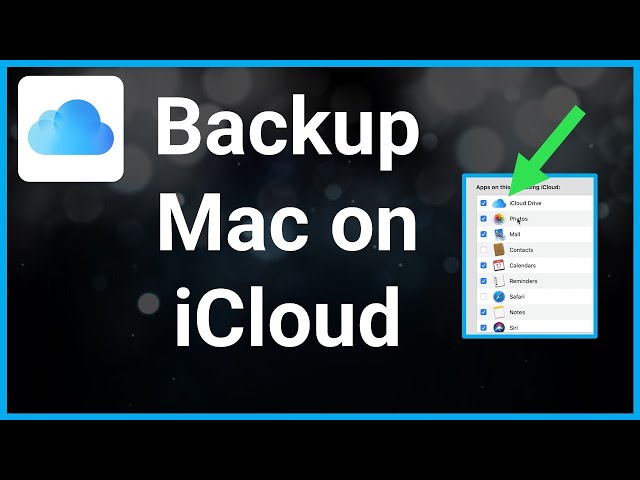
You’re probably already set up to back up your Mac to iCloud if you have an Apple ID. To see whether your Mac is backed up to iCloud, go to System Preferences by clicking the Apple symbol in the upper left corner. Select the “iCloud” option on the left-hand side. If there is no “iCloud Drive” option on this screen, it signifies that your Mac is not presently backed up to iCloud. Select Options…” next to iCloud Drive to begin backing up your Mac to iCloud.
From here, you can choose which applications and documents will be backed up by checking the boxes next to them. Finally, choose “Back Up Automatically” to ensure that your data is always safely kept in iCloud. Once done, any documents generated in these applications that are linked to iCloud will be automatically synchronized and backed up without your intervention.
How do I access my iCloud backups?
It is simple and handy to access your iCloud backups. To access and restore your Macbook Pro from an iCloud backup, make sure you’re connected to a secure Wi-Fi network and have a valid Apple ID. Then, open System Preferences and go to the “iCloud” section. The option to “Back Up Now” will then appear; click it. Depending on the size of the backup, the backup procedure may take some time.
After the backup is complete, pick “Restore From Backup” to either select a single backup or restore from all of your iCloud backups. Following the on-screen instructions, complete setting up your Macbook Pro from an iCloud backup:
- Connect to a secure Wi-Fi network and have a valid Apple ID.
- Open System Preferences and go to the “iCloud” section.
- Click “Back Up Now”.
- Pick “Restore From Backup” to either select a single backup or restore from all of your iCloud backups.
- Follow the on-screen instructions.
How do I get my data from iCloud?
Restoring from an iCloud backup is a simple procedure. If you have already backed up your Macbook Pro to iCloud, you may quickly and easily restore deleted data.
- Launch the Finder software and press Shift-⌘-G to open the ‘Go to folder’ pane.
- Put “/Library/Application Support/MobileSync/Backup” into the search bar. This will take you to the folder where your backups are stored.
- Choose a backup that contains the most recent version of the data you want to restore and press the “restore” button. The backup will then be copied back to its original place on your Macbook Pro using iCloud.
- If this does not work, try resetting your Macbook Pro’s sync settings in System Preferences. Reset Sync Data in iCloud Advanced.
- After that, repeat the procedures above and, if required, try to restore from another backup file.
How do I download all my data from iCloud?
Downloading data from iCloud is a straightforward process that will enable you to restore a Macbook Pro to its original settings once an Icloud backup has been produced. To begin, pick System Preferences from the Apple menu at the top of your screen →.
Select iCloud in the left-hand corner of the System Preferences window →. Once in iCloud, choose the Restore Files option →tab. Choose the sort of file you want to restore, whether it’s images, music, documents, or anything else. Choose whatever files to restore and then click Restore ✓ in the bottom right corner. Wait for iCloud to download all of your data before it displays on your Macbook Pro after you indicate that you wish to restore all of your preferred files.
How do I recover files?
There are a few procedures to follow if you need to restore data on your Macbook Pro from an Icloud backup.
- Ensure that your Icloud backup is configured and enabled on your Macbook Pro.
- Enter the Icloud settings and select ‘Backup’.
- Pick which files to restore from the backup that includes all of your data.
- This will help you to recover all of the data that was lost during an emergency or a computer disaster.
- If necessary, third-party software or tools such as iClouder may assist move some of the data from Icloud to other places like as a thumb drive or external hard drive for added protection against data loss.
Can I restore my Mac to an earlier date without Time Machine?
It is possible to restore your Mac without utilizing Time Machine, although this method is a little more complicated. You will need to use an iCloud backup that has been saved in the cloud to do this. To use the iCloud management panel, you must first connect your Mac to the internet and sign in with your Apple ID. From there, you may choose a previous date and restore the computer to its previous condition.
Any modifications made before to restoring cannot be undone since they would replace current data on the Mac with whatever was backed up during that time period. Furthermore, if you have not previously set up iCloud backup, you will be unable to utilize this procedure and should instead use Time Machine or another backup system to correctly restore your Mac:
- Set up iCloud backup.
- Use Time Machine.
- Utilize another backup system.
Should I restore from Time Machine or reinstall macOS?
If your Macbook is facing technical problems, you may be thinking if it is best to restore from Time Machine or reinstall macOS. The optimal solution is usually determined by the nature of the problem and the version of macOS installed on your Macbook Pro.
If you have a hardware problem, problems with essential functionality such as networking, or your screen is acting strangely, reinstalling the complete operating system is the best solution.
If your Macbook Pro has software difficulties, such as flaky programs or damaged data, restoring from Time Machine may be a preferable alternative. Restoring from Time Machine will leave all of your settings and data intact while replacing any problematic programs or files. However, it is crucial to know that restoring from backup might erase current files and settings, so make sure to back up any vital data in case anything goes wrong during the procedure.
How long does it take to restore a Mac from Time Machine?
Depending on the size of the backup and the speed of your Internet connection, restoring a Mac from Time Machine may take several minutes to more than an hour. It should take less time to restore from a local disk than through iCloud or a networked device.
When you restore using Time Machine, your Mac copies all data and programs to the Mac to which it is being restored. This assures that everything is precisely as it was when you backed up the previous time. It will also ensure that all software is current and ready for usage. This procedure might take several minutes to an hour or more, depending on how much data has to be transferred and confirmed.
How do I access backups on my Mac?
Backing up your Macbook Pro using an iCloud backup is an excellent method to keep your data secure in the event of a crash or other problem. Backups on your Mac may be accessed in a few easy steps.
- To begin, enter System Preferences and choose the “iCloud” option. You will have access to all of the iCloud backups saved in iCloud Drive, as well as tools to manage and restore them.
- After you’ve chosen the backup you wish to view, go to the “Backups” tab and click the “Restore” option. This allows you to choose which settings and data to restore from the backup, giving you complete access to those files and settings without having to manually re-enter them all. When that is finished, click Next and then Finish when requested.
- Everything in your backup should now be available from your Macbook Pro.
How do you hard reset a MacBook pro?
A hard reset is a simple operation that restores your MacBook Pro to its original factory settings and clears your hard disk of all data. This is also known as a system reset or a power cycle.
To complete the hard reset, press and hold the power button on the side of your laptop for several seconds until it totally shuts off. After that, you may remove the power button and restart your laptop by hitting the same power button again.
This form of reset is best done when standard troubleshooting has failed, such as if you feel there is a problem with macOS or an application. It is also important if you want to give or sell your MacBook Pro since it ensures that all traces of personal information are deleted from its memory. As a result, it is suggested that you do a hard reset before gifting or selling your Macbook Pro to ensure that any personal papers and data are protected.
How do I restore a MacBook Air to factory settings?
Restoring your MacBook Air to factory settings is a simple procedure that enables you to start over and delete all of your personal data and information. The first step is to ensure that you have taken all required backups in case anything goes wrong during the reset procedure.
To begin, launch the Finder on your MacBook Air and go to Applications > Utilities > The Apple Configurator 2. Select All Devices at the top of the window in the program and then click Restore. Choose a model from the list of Apple models that are supported. If you’re recovering a laptop model, go for the MacBook Air.
Finally, input your iCloud credentials to complete the restore procedure, and then restart your iPhone. Your MacBook Air will now be reset to factory settings, and all user data will be wiped.
How do I reset my MacBook Pro 2015?
If you need to restore your MacBook Pro 2015 from an iCloud backup, the procedure is straightforward. Make sure your Macbook is linked to a Wi-Fi network first. Then, open System Preferences and go to the “iCloud” section. Click “Sign In,” then enter the account information linked with your Apple ID. After logging in, go to the “Backups” tab at the top of the window and click “Restore from Backup.” Then, on your Macbook Pro, choose which devices’ data you wish to restore. Finally, when requested, click Restore to confirm the restore.
The restoration procedure may take some time depending on how much data it has to back up, but once completed, all existing user information from your previous iCloud backup should be restored onto your MacBook Pro 2015 device.
How do I know if my MacBook Pro is backed up?
If your MacBook Pro has an iCloud backup, you may retrieve this information by going to the System → Software Update pane in System Preferences. You must pick the ‘Restore’ option and the most recent available backup. You should then see information about when your Macbook Pro was backed up as well as the kind of data contained in the backup.
If your MacBook Pro does not have an iCloud backup, you may use Time Machine to back up your data and settings on a regular basis. To do so, go to System Preferences and choose Time Machine. You may define a schedule for backups and configure other aspects of your backup process from this window. Once enabled, Time Machine will produce a full duplicate of your data on your MacBook Pro every time it runs a scheduled backup.