Table of Contents
- How do I remove the harddrive from my MacBook Pro 2010?
- How do I remove the harddrive from my Macbook Pro 2011?
- Can I put SSD in enclosure?
- How do I upgrade my Macbook SSD to 2019?
- How much does Apple upgrade SSD Cost?
- Can you upgrade the SSD on a MacBook Pro 2020?
- Can you upgrade the SSD on a MacBook Pro 2021?
- How do you remove a hard drive from a MacBook Pro 2015?
- How do I remove the hard drive from my MacBook Pro 17 inch?
- How do I access hard drive on MacBook Pro?
- How do I find my SSD on Mac?
- How do you eject a hard drive from a Mac?
- Why is my SSD not showing up Mac?
- Can I upgrade my 2010 MacBook Pro?
- What SSD works with MacBook Pro 2011?
- What size hard drive fits in a MacBook Pro?
- Can you connect SSD via USB?
- Will external SSD make laptop faster?
- Can you put an SSD in a hard drive bay?
- Can you replace a Mac SSD?
- Can you change the hard drive on a MacBook Pro 2019?
- Is MacBook Pro SSD soldered?
- How fast is MacBook Pro SSD?
- Can you upgrade M1 SSD MacBook Pro?
- How much does it cost to upgrade SSD in MacBook Pro?
- Can you change the hard drive on a MacBook Pro 2020?
- Can you add storage to MacBook Pro 2021?
- Are MacBook Pros upgradeable?
- Is a 256GB SSD enough?
- Is MacBook Air 2020 SSD soldered?
Are you thinking about upgrading your MacBook Pro’s storage? Or maybe you need to replace a damaged SSD? In either case, you’ll need to know how to remove the existing SSD from your laptop.
In this blog post, we’ll show you how to safely remove an SSD from your MacBook Pro. We’ll also share some tips on how to avoid damaging your SSD and your laptop in the process.
How do I remove the harddrive from my MacBook Pro 2010?
Removing the hard disk from a MacBook Pro 2010 is a pretty simple task, but it’s important to take basic care and be gentle to prevent hurting the device or creating future problems.
To remove the hard drive, turn off your MacBook Pro and unhook any cords that are attached to it. Next, find your laptop’s bottom casing and loosen the screws that hold it in place. Then, find the drive bay and gently raise up on the hard drive while pushing out on both sides.
After removing the hard disk, keep it somewhere secure until you’re ready to reinstall it. When replacing your hard drive, make sure the connections are lined up with their ports before gently pushing them in until they’re securely placed. After that, you may restart your laptop and use all of its functions as usual.
How do I remove the harddrive from my Macbook Pro 2011?
Removing the hard disk from a Macbook Pro 2011 is a straightforward but possibly dangerous procedure. Before removing the hard disk and unplugging all power sources, take the following steps:
- Before you begin, switch off your Macbook Pro by holding down the power button until it goes off. Then, unplug the power cable and, if necessary, remove any batteries.
- Remove any additional external devices from your laptop, such as a mouse or an external display.
- Finally, properly ground yourself so that static energy does not harm your computer.
Next, open the lid of your MacBook Pro and look for the detachable disk tray under the keyboard. Slide out this tray carefully by first hitting Eject on your Mac’s keyboard to release it, then raising it away from you so that you do not contact its connections with other devices in case of an electrical spark or short circuit.
Now you may safely remove all of the cables that are attached to your hard drive, removing them from both ends before gently wriggling them free from their ports on each side of the disk. After you’ve completed disconnecting all wires, you may securely remove the hard disk from its tray and store it somewhere for future use or destruction.
Can I put SSD in enclosure?
Putting an SSD in an enclosure is an excellent method to securely store and transfer data from one computer to another. It’s also an excellent choice if you want to save space without losing performance or capacity.
When choosing an enclosure for your SSD, check sure it is compatible with your Macbook Pro model, since some are not. Make certain that the enclosure supports SATA III speeds so that you can transfer data rapidly. It’s critical to remember to always safely shut down the laptop before detaching the drive from its power supply.
Finally, while inserting your SSD inside an enclosure, make sure it is securely fastened to avoid physical damage and any data loss.
How do I upgrade my Macbook SSD to 2019?
Upgrading your Macbook SSD to 2019 is simple and risk-free. The first step is to unplug your existing SSD. To do so, use a Phillips-head screwdriver to detach the laptop’s bottom panel. After removing the SSD tray, gently slide it out and detach it from the main logic board.
After securely removing your old SSD, you may buy a new one from almost any computer or electronics retailer. Before purchase, ensure that the new SSD is compatible with your MacBook Pro. Insert your new SSD into its tray and reconnect it to the main logic board when finished. After that, reconnect all of the screws and restart your Macbook Pro with the increased storage drive.
How much does Apple upgrade SSD Cost?
The cost of upgrading an Apple MacBook Pro’s SSD solid state drive is determined by various variables. First, the price is affected by the size of the SSD, as well as the brand and generation of the laptop. Second, the pricing will vary based on availability whether you get an updated model through Apple’s online store or shop for an upgrade from a third-party.
A simple 512 GB SSD upgrade from Apple’s online shop costs around $400, with higher-end versions costing up to $1,200. Third-party vendors often offer reduced upgrades, and package offers may be available, lowering the total cost of replacing your MacBook Pro’s storage device. Installing an SSD yourself may also save you money as compared to hiring an expert.
Before continuing with any purchase or upgrade plan, it is essential that you do research on several sellers:
- Compare prices offered by Apple’s online store.
- Check for package offers from third-party vendors.
- Consider installing the SSD yourself to save money.
Can you upgrade the SSD on a MacBook Pro 2020?
You may or may not be possible to upgrade the SSD on your MacBook Pro depending on the model. Certain MacBook Pro models have soldered on SSDs, which means the memory is permanently attached to the circuit board and cannot be upgraded.
Users may replace their present SSD with a bigger capacity one on certain models. This is achieved by unscrewing the rear of the laptop, removing the old unit, and installing a new one. Before utilizing a new SSD, it’s essential to properly format it and install an operating system or do a factory restore.
Users should also use caution while handling laptop components, since they may easily be damaged if handled incorrectly.
Can you upgrade the SSD on a MacBook Pro 2021?
The answer is yes, it is feasible to upgrade the SSD in a 2021 MacBook Pro. However, this process is not as straightforward as just removing the old SSD and replacing it with a new one. You must carefully remove the previous SSD using professional-grade equipment, as well as consider other considerations such as the size of your new SSD and ensure that it will fit in your MacBook Pro if it is bigger. Before proceeding with the upgrade, you should also evaluate if your selected SSD is compatible with your MacBook Pro.
As with any upgrade, be sure you’ve taken all necessary measures while working with fragile electrical components:
- Carefully remove the previous SSD using professional-grade equipment.
- Evaluate the size of your new SSD and ensure that it will fit in your MacBook Pro.
- Ensure that your selected SSD is compatible with your MacBook Pro.
- Take all necessary measures while working with fragile electrical components.
How do you remove a hard drive from a MacBook Pro 2015?
To remove a hard disk from a MacBook Pro 2015, turn the machine off and unhook any external peripheral devices. Then, you must remove the laptop’s rear cover to uncover the battery and hard drive compartment. This is accomplished by unscrewing 10-12 screws on the laptop’s underbelly.
After all screws have been removed, the batteries and hard drive should simply come out with little light push. Keep note of all screws that are removed to facilitate reassembly. After removing the hard drive, you may replace it with a compatible model or, if necessary, upgrade it to a greater size. This will guarantee that no elements of your laptop are destroyed throughout the procedure.
How do I remove the hard drive from my MacBook Pro 17 inch?
A hard disk may be removed from your MacBook Pro 17 inch in a few easy steps. To begin, switch off the laptop and disconnect it from the power source. Then, find the hard drive door, which is positioned near either side of the trackpad on the bottom of the laptop. Once you’ve located this door, slide it open and remove the hard drive.
To fully remove it from your laptop, use a flat-head screwdriver or plastic spudger to gently pry it out of its socket. Finally, before removing it from your MacBook Pro 17 inch, unhook any cords that are attached to it.
If you carefully follow these procedures, you should be able to remove your SSD without destroying anything inside your MacBook Pro 17 inch.
How do I access hard drive on MacBook Pro?
When you want to access the hard drive on your MacBook Pro, you’ll need to follow the proper procedures to safely and securely remove the SSD.
- Turn off your MacBook and unplug any external devices or connections that are attached to it.
- The bottom cover of your MacBook Pro should now be removed. This may need the use of a Toolkit, depending on the model.
- With the bottom cover off, locate and screw or unclip any screws or clips that keep your hard drive in place.
- After that, gently remove the SSD from its slot and disconnect any wires attached to it before storing it in a static-free area.
- Reassemble your MacBook Pro and restart it as normal.
You may securely access and remove an SSD from your MacBook Pro without causing any harm to either device if you follow these procedures in the correct sequence.
How do I find my SSD on Mac?
The Solid State Drive (SSD) in Mac computers is housed within the computer. Depending on the model of your MacBook Pro, you may need to remove the bottom shell to have access to the internal components. You’ll need a tiny Phillips screwdriver and maybe a pentalobe screwdriver to complete this.
You may be able to find your SSD immediately after removing the bottom cover. It is connected to a long ribbon cable and appears as a long bar with several chips on it. The chip tips should have little squares of metal or gold that link to other components such as motherboards and other electronics.
If you can’t find your SSD right away, try for additional components linked through a ribbon cable, such as
- hard drives
- memory sticks
Although these components are not SSDs, they may serve as indicators for where your disk is generally positioned inside your Mac notebook.
How do you eject a hard drive from a Mac?
Ejecting a hard disk from your Mac is a straightforward procedure that just takes a few steps:
- Shutdown any applications and activities related with the external drive.
- Launch the Finder, pick the device in the left column, and then click on File > Eject [Device Name].
After that, you’re ready to remove the external storage device from your laptop.
When physically detaching an SSD or any sort of hard drive from your Mac, press and hold the laptop’s power button for several seconds until it fully shuts down. This guarantees that before physically detaching the disk from your system, all data on it is securely deleted from memory. If you don’t do this, the data may be damaged as a result of an incomplete file transfer upon disconnecting and putting it back in.
Why is my SSD not showing up Mac?
When connected to your Macbook Pro, it’s not unusual for an SSD to not appear as rapidly as you’d anticipate. It may take a few minutes for OS X to identify and load the drive. The problem might be a loose connection, faulty disk formatting, outdated drivers, or damaged data on the drive. Always verify that you have backed up your data and have a complete system backup before trying any repairs or replacement of your SSD.
After you have backed up your data, reconnect the SSD. Check that all wires are correctly connected and firmly in place. If this does not work, restart your Macbook Pro. It may take a few tries until OS X successfully identifies and loads the disk.
If you’ve done everything else and still don’t see your SSD on Mac, it’s conceivable that the drive has corrupted data that need to be fixed or replaced with new ones. In such circumstances, you may need the assistance of an IT specialist to thoroughly resolve the problem.
Can I upgrade my 2010 MacBook Pro?
The answer depends on the specific model of your 2010 MacBook Pro. In general, many of the newer models after 2010 may be updated with a new storage drive or solid state drive (SSD). However, in order to do it securely and properly, you must utilize the proper instruments and be knowledgeable with the procedure.
Before you try to upgrade your device, be sure you understand the components you will need to replace or upgrade. Most crucially, if your MacBook Pro has a SATA hard drive rather than an SSD, you must have access to the proper equipment in order to properly remove it. While it comes to software, selecting an operating system such as macOS Sierra or later can assist guarantee maximum performance when changing disks.
Finally, updating your 2010 MacBook Pro is possible, but you must first ensure that you have the necessary equipment and experience. If you have any questions regarding the upgrade procedure, visit online resources or an Apple-certified expert.
What SSD works with MacBook Pro 2011?
The MacBook Pro from 2011 is compatible with a large choice of replacement SSDs, however your individual model has certain compatibility criteria. The 2011 MacBook Pro needs a SATA II 3.0 Gbps, 6Gbps, or 12Gbps, 2.5″ drive with a maximum thickness of 9.5mm and a connection type of 7+15 pin SATA Type III.
If you want to upgrade the SSD in your 2011 MacBook Pro, acceptable options are the Crucial MX500 and the Western Digital Blue 3D NAND 500GB Internal SSD. Both of these SSDs are inexpensive, dependable performance improvements that are simple to install and offer fast enough speeds for gaming and remote work on huge files or projects.
If you need extra storage space, the Samsung 860 EVO, which comes in 1TB and 2TB sizes, is a fantastic choice since it has rapid read/write rates.
What size hard drive fits in a MacBook Pro?
MacBook Pro laptops are available in a variety of sizes, each with its own set of hard drive needs. All MacBook Pro versions have a hard drive bay that can accept a SATA hard disk. The maximum hard drive size, however, is determined on the model and year of manufacturing.
The newest MacBook Pro 13-inch and 16-inch variants can accommodate up to 4TB of internal storage. There is a restricted choices for max HDD size for previous models pre-2016, since these machines only provide up to 1TB as their maximum capacity. These computers may also accommodate SSDs ranging from 128GB to 4TB, depending on the model.
When it comes to replacing or upgrading the hard drive in your present Mac, it is critical to understand the compatibility between your Mac’s model and the various hard drives that fit inside it. Choosing an unsuitable or incorrectly sized disk might result in laptop damage or other difficulties that may need expensive repairs or replacements.
Can you connect SSD via USB?
Yes, you can connect a Solid State Drive (SSD) through USB. This may be accomplished with the help of an external docking station or an adapter.
When connecting via dock, the SSD must be inserted in the dock’s drive bay. The SSD will then be linked directly to your computer’s motherboard through a SATA connection, and then via a USB cable to your computer’s USB port.
You may connect your SSD to your laptop’s USB connection with an adapter, eliminating the need for a dock or other wires. This technique is appropriate if you lack the docking station and cables needed for the first option. Before continuing, make sure that your laptop is compatible with the appropriate cable or adapter, whatever way you pick.
Will external SSD make laptop faster?
An external SSD may significantly improve the performance of your laptop or desktop computer. When you connect an external SSD to your laptop, it will utilise quicker storage than a regular hard drive, enabling you to benefit from faster load times, faster boot times, and overall superior performance.
Furthermore, by utilizing an external SSD, you may increase storage space without replacing any hardware in your laptop.
External SSDs are also beneficial since they use less power than regular hard drives, resulting in increased battery life for your laptop. An external SSD also produces significantly less heat and noise, making it perfect for individuals who want to keep their computers cool and quiet. So, if you want a quicker and more responsive laptop, installing an external SSD is absolutely something to think about.
Can you put an SSD in a hard drive bay?
Replacing your MacBook Pro’s hard drive with a solid state drive (SSD) is one option to make your laptop easier and faster to operate. However, before you do, you need to know how to correctly and safely remove an SSD from your MacBook Pro. Follow these simple steps:
- Turn off your computer and unplug all cords and peripherals.
- Unscrew the screws on the bottom of your laptop to remove the bottom panel.
- Remove the hard drive tray that houses the SSD.
- Unscrew the screws that keep the SSD in place so that you may gently remove it from its slot without damaging it or other components in your laptop.
- Gently remove any lingering dust or debris from the area where you’ll be installing a new SSD, since this might create issues during installation if it’s left on sensitive components like fans or heat sinks.
Then reinstall the bottom panel onto your laptop with its screws secure as before, plugging back in all peripheral devices when finished if desired for use again shortly after upgrading storage capacity for increased speed and performance of tasks requiring data access regularly on-the-go or over extended periods of time while away from desk/home/office space while traveling/working remotely away from main offices/locations daily, weekly, or during special project periods. Long-term outside of regular office hours routine operations Procedure protocols established company-wide protocol standards set in place organizationally across departments going forward agreed upon by corporate governance board members leading in collaboration with HR representatives legally authorized accordingly & authorized thusly for proper handling of such matters going forward into future cycles. Yes, & cycles beyond present & current transitory periods in existence moving ahead into perpetuity effectively forming unbreakable loops throughout eternity referring directly to sustaining progress & progressivism altruistically wherever applicable.
Can you replace a Mac SSD?
The quick answer is that you can replace a Mac SSD. This is doable with both newer and older MacBooks, but various approaches are required depending on the model. Some models need access to the interior of the laptop, necessitating the use of more equipment than others.
There are various measures to take when replacing an SSD in a MacBook Pro to guarantee the safety of both data and hardware:
- Ensure that your Mac is turned off and removed from any power source. Then, undo the screws from under the laptop and carefully raise up to get access to the components beneath.
- Find and remove the present SSD drive by unscrewing it from its bay.
- Finally, fit your new SSD drive into its slot before securely screwing everything back together so you don’t wind up with a half-open laptop.
Can you change the hard drive on a MacBook Pro 2019?
Replacing the hard drive in a MacBook Pro 2019 is a very simple operation, but safety measures must be taken. Before you begin, ensure sure your laptop is turned off and disconnected from any power source. If you need to remove any existing screws or components, store various sized screws together and separate them to keep them organized until you’re ready to reassemble the laptop.
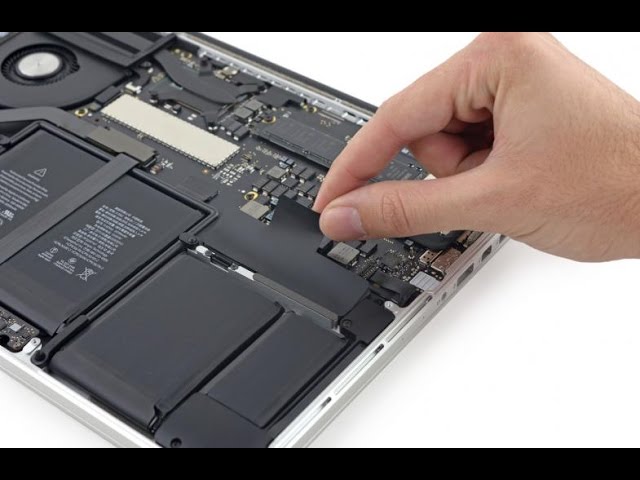
Once all of the screws have been removed, gently peel off the back panel. The SSD should be visible now.
To properly remove the SSD, gently grip it with both thumbs on each side of the drive before carefully lifting it out of its slot. Some laptops may need a screwdriver or other tool for more leverage; if so, use one hand on each side of the SSD while applying equal pressure to both sides of the tool. Once removed, place your SSD in an anti-static bag until you’re ready to reassemble it.
Is MacBook Pro SSD soldered?
The SSD utilized in MacBook Pro models is soldered in place, thus the answer is yes. This implies that it is permanently bonded to the logic board and cannot be removed without ruining it physically.
This makes removing the usual internal solid-state drive SSD from the MacBook Pro difficult, if not impossible. To properly remove an SSD from your MacBook Pro, first deactivate system integrity protection and then desolder the SSD from its logic board connector. Even if you were successful, your new drive may need a specific connection adaptor to be compatible with your computer’s motherboard.
Because of these difficulties, most experts advise against trying to upgrade or replace an internal MacBook Pro’s SSD. However, if you are informed and motivated enough, it is doable. Before performing this process, make sure to read up on all of the relevant safety information and get acquainted with correct disassembly practices for your specific Mac model:
- Deactivate system integrity protection.
- Desolder the SSD from its logic board connector.
- Ensure new drive is compatible with your computer’s motherboard.
- Read up on all relevant safety information.
- Get acquainted with correct disassembly practices for your specific Mac model.
How fast is MacBook Pro SSD?
SSDs in MacBook Pros are exceptionally fast, with read and write rates of up to 3.2 GB/s. This is substantially quicker than the read and write rates of a hard disk, which normally only reach approximately 100 MBps.
Because of the increased speed, you can access, transmit, and save data considerably faster on your MacBook Pro with an SSD than you could on a regular hard drive. Furthermore, the absence of moving elements in an SSD makes it more durable and less likely to be destroyed in transport or while in use. Finally, since an SSD drive requires no electricity to operate as compared to a hard disk drive (HDD), you will have longer battery life while using MacBooks equipped with them.
Can you upgrade M1 SSD MacBook Pro?
Yes, you may upgrade the M1 SSD MacBook Pro. However, it is crucial to remember that accessing the M1 SSD is a complex job that needs disassembling the whole laptop.
If you want to upgrade your M1 SSD MacBook Pro, you’ll need a few tools to get the job done right. A Torx T6 screwdriver set, a set of plastic opening tools and tweezers, an outside laptop case, and an external disk enclosure or adapter are among the items included.
Once you’ve acquired all of these tools, you’ll need to connect them in order to properly remove the SSD from your MacBook Pro.
- After you’ve correctly connected everything and secured the external drive enclosure or adapter, you’ll need to switch off your laptop before detaching the old drive from your laptop through its SATA wire or your USB-C port cable connection.
- After you’ve successfully detached that, you’ll need to install your new SSD into your Macbook Pro through SATA cable or USB-C port connection.
- Finally, after all connections have been re-established and the screws on the casing of your MacBook Pro have been tightened back into place, it will be ready to power up with its new upgraded M1 SSD inserted.
How much does it cost to upgrade SSD in MacBook Pro?
Upgrading the SSD in your MacBook Pro may boost its speed and storage capacity dramatically. Depending on the type of your Mac laptop, the cost of replacing your SSD might vary from a few hundred to over a thousand dollars.
If you have a 2017 or newer model, you should consider the cost of the new SSD as well as any adapters required for your upgrade. If you have an older Mac laptop model, an aftermarket upgrade may need extra components such as an I/O board or logic board in addition to the new SSD itself.
In order to properly remove and replace your present SSD, you will also need to acquire a toolkit and have access to external Mac tools such as a Torx screwdriver set.
Can you change the hard drive on a MacBook Pro 2020?
Yes, the hard disk in a MacBook Pro 2020 can be replaced. However, if you are unfamiliar with the components in MacBook Pros and have little technical familiarity with such devices, it is recommended that you get professional help.
It is critical to remove an SSD from your MacBook Pro carefully for a variety of reasons, including data security and the performance integrity of any associated components.
It is critical to wear anti-static gloves and a static mat while completing this activity since static electricity may harm or destroy the integrated circuits in your device. You will also need equipment intended for opening Apple computers, such as magnetic screw drivers or plastic pry bars. Only once you’ve opened your device and detached all connections leading to your hard drive, including any power cables, can you securely remove the SSD from its mountings using tiny tweezers or pry tools.
Can you add storage to MacBook Pro 2021?
The answer to the question of whether you can add storage to your Macbook Pro 2021 is yes. The new MacBook Pro models have a detachable SSD, making it simple for consumers to upgrade their storage. Simply open the back panel of your Macbook Pro and remove the SSD drive to do this.
Even while this method is rather straightforward, it is always advisable to employ adequate safety precautions before conducting any alterations, such as purchasing an anti-static strap or grounding oneself. After securely removing the present disk, you may replace it with a larger capacity SSD and enjoy improved performance on your MacBook Pro 2021.
Are MacBook Pros upgradeable?
Yes, MacBook Pros can be upgraded. They include a solid-state drive (SSD) that is readily removed and replaced with a bigger or faster disk. The drive’s model and size are determined by the year and size of your MacBook Pro. Depending on the MacBook Pro, you may need a few tools to gently open it up and reach the SSD to replace it. You must also ensure that the new SSD is compatible with your specific model of MacBook Pro.
If you want to upgrade other components, such as your RAM or CPU, you should consult with Apple first since they restrict which parts are compatible with their systems.
Is a 256GB SSD enough?
When it comes to storage space for your MacBook Pro, a 256GB SSD is generally more than adequate for most users. More storage than this is unlikely to be required by the ordinary user. However, if you edit huge files or store a lot of music, images, and videos, you should consider upgrading to a larger SSD.
Most people will find 256GB to be plenty for their daily requirements. This amount of memory is often sufficient for word processing programs, web browsers, and other small-scale tasks. It also has ample space to save essential documents, images, and videos, as well as a significant number of music files – however if you’re a serious music collector or digital audio editor, you may want to consider upgrading to a bigger capacity SSD.
Finally, before trying to remove the SSD from your MacBook Pro, be sure that all power sources are turned off. Pushing the power button while uninstalling might do catastrophic harm, rendering your Mac worthless – therefore be sure all sources of power are turned off first:
- Unplug all cables and power sources.
- Turn off the MacBook Pro.
- Wait for the laptop to cool down before proceeding.
Is MacBook Air 2020 SSD soldered?
The answer to whether the SSD in the MacBook Air 2020 is soldered is yes. A soldered solid-state drive (SSD) serves as the main storage device in the current MacBook Air models. This implies it is permanently linked to the motherboard and cannot be removed.
For security and performance concerns, Apple often employs soldered SSDs. Because the components are so close together, latency is reduced and speed is increased.
Soldering is the process of permanently joining two components together by forming an electrical connection between them. Removing or replacing an existing component would need the use of desoldering equipment, which may be costly and hazardous if not done appropriately. As a result, Apple advises customers to never try to remove or replace a soldered component without professional assistance from an Authorized Service Provider.