
Table of Contents
- How do I backup my iPhone to my Mac without iTunes?
- How do I backup my iPhone to my Macbook Air without USB?
- How do I manually backup my iPhone?
- How do I backup my iPhone to my computer?
- Where are iPhone backups stored on Big Sur?
- Where is iPhone backup stored on Mac Monterey?
- Where are iPhone backups stored Mac OS?
- How do I automatically sync photos from iPhone to Mac?
- How do I download pictures from my iPhone to my Mac 2021?
- How do I AirDrop photos from my iPhone to my Mac 2021?
- How do I backup my iPhone to My computer 2021?
- Why wont my computer let me backup my iPhone?
- Why can I not backup my iPhone?
- Can I backup iPhone without iTunes?
- Can I backup my iPhone to my computer instead of iCloud?
- How do I backup my iPhone to my Mac wirelessly 2020?
- How do I backup my iPhone without iCloud?
- How long does it take to backup iPhone to Mac?
- How do I change the location of my iPhone backup on Mac Big Sur?
- Does iTunes still exist on Mac?
- Does iPhone backup include photos?
- Why cant I transfer Photos from iPhone to Mac?
- How do I sync Photos from my iPhone to my Mac wirelessly?
- How do I automatically sync Photos from iPhone to Mac wirelessly?
- What is the easiest way to transfer photos from iPhone to Mac?
- How do I transfer my photos on my iPhone to my computer?
- How can I see my iPhone photos on my Mac in Finder?
- Can you AirDrop all Photos from iPhone to Mac?
- Why cant my phone AirDrop to my Mac?
- Can you AirDrop all your Photos at once?
The simplest way to backup your iPhone is to use iCloud, but if you want to do it with a Macbook Air, there’s a bit more to it. Here’s a step-by-step guide on how to backup your iPhone to a Macbook Air with Big Sur.
How do I backup my iPhone to my Mac without iTunes?
The method of backing up your iPhone to your Macbook Air using Big Sur is simple. This is possible without using iTunes or iCloud. All you need is the correct software, like the free iMazing program.
You may effortlessly backup any form of data from your iPhone to your Mac with this program. You may use the iMazing program to back up photos, contacts, messages, and other data to your computer’s hard drive.
- Connect your iPhone to your Mac using a USB cord once you’ve loaded and run the iMazing program on both devices.
- Select ‘Backups’ from the main navigation bar on the left side of the window.
- Click ‘New Backup’ to create a comprehensive backup of all data on your device, including applications.
- Before hitting ‘Backup,’ you will be able to decide which information and applications will be included in the backup by checking the boxes next to each one.
- Once finished, unplug and save the backup in a secure location.
How do I backup my iPhone to my Macbook Air without USB?
Backups are a crucial aspect of digital security because they ensure that you can access critical data even if your main device is lost or destroyed. Fortunately, whether you have a USB connection or not, Apple makes it simple to generate backups of your iPhone on a Macbook Air running Big Sur.
Using iCloud is the simplest method to backup your iPhone data to your Macbook Air. Simply open the Settings app on your iPhone and pick iCloud. Enable iCloud Backup and then click the “Back Up Now” button. This will generate a backup of all the data on your iPhone, which will be accessible from any Apple device with an internet connection.
When connected via USB connection, you may also use iTunes to back up a duplicate of everything on your iPhone. To do so, launch iTunes on your Macbook Air and plug in your device using the provided USB cord. In iTunes, choose the device from the bar, then click “Back Up Now” in the popup that displays. Depending on how much data is being backed up, the procedure may take some time to finish.
How do I manually backup my iPhone?
Manual backups are useful when your iPhone’s automated backup functionality is not working or you just want to ensure that your data is stored up. When backing up an iPhone manually, you must connect it to a computer using a USB cord.
To manually backup an iPhone on a Macbook Air using Big Sur, launch Finder and go to the Locations folder. Select your device and then click the “Manage Backups” button at the bottom of the page. This will backup all of your data, including photos, music, contacts, calendar events, and other information.
It’s crucial to keep in mind that manual backups might take some time, depending on how much data you have on your phone. When the backup is finished, a notification will display informing you that it was successful and may encourage you to save the contents in iCloud for safekeeping.
How do I backup my iPhone to my computer?
Backing up your iPhone to a computer is a vital step in ensuring the security of your data. The procedure for backing up your iPhone to a Macbook Air using Big Sur is simple, but there are a few steps to follow:
- Use the provided USB cable to connect your device to your Macbook Air.
- Launch the Finder app and choose your device from the list of available devices.
- Click “Backup” and choose “This Computer” as the backup data location.
- Finally, click “Back Up Now” to begin the file transfer procedure.
When finished, you will have successfully backed up all of the data on your iPhone to your Macbook Air. It’s crucial to remember that you’ll need Wi-Fi to complete the backup process, and it’s great practice to back up all of your devices on a regular basis.
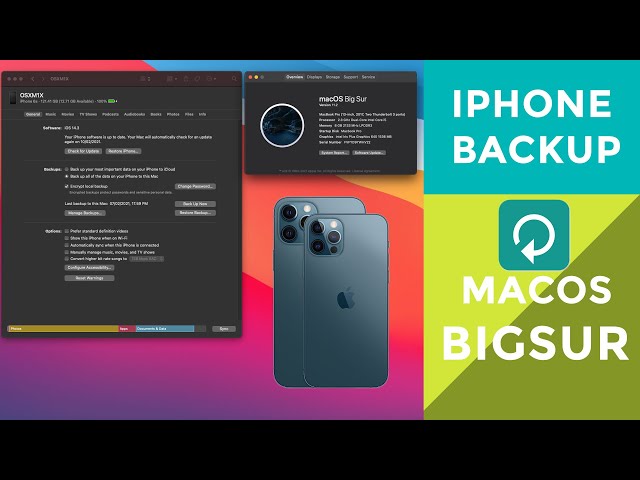
Where are iPhone backups stored on Big Sur?
If you use an iPhone with a Macbook Air running the most recent version of macOS Big Sur, you may be asking where your iPhone backups are kept. Apple saves backups to a folder on your Macbook Air’s hard disk. This directory may be found in /Library/Application Support/MobileSync/Backup.
The simplest approach to find it is to launch Finder and choose “Go > Go To Folder.” Then enter “/Library/Application Support/MobileSync/Backup” and press Enter.
This folder holds a backup for every iOS device that has ever been backed up on this Mac. If you create a new backup, be sure the device name in iTunes or Finder matches one of the current folders, otherwise it will be generated as a new backup folder. When configuring your new backup, make sure the encryption and password settings are correct to safeguard your data from illegal access. Remember to remove the associated folders when removing previous backups; if any data remains in them, it may interfere with future backups.
Where is iPhone backup stored on Mac Monterey?
When backing up an iPhone to a Macbook Air using Big Sur, the iPhone backup files are saved at a specified spot on the Mac Monterey. The precise location of your backups is /Library/Application Support/MobileSync/Backup/. To access this folder, use Finder and press Command+Shift+G.
You can access all of your iPhone’s current and previous backups here.
It’s vital to know that if you don’t have a separate hard drive or external storage solution, all of your information will be kept on the internal storage of the MacBook Air. Furthermore, although it may take up a significant amount of space, it is suggested that you activate local backups so that if anything happens to your iCloud account or if iCloud becomes full, all of your data will still be stored locally on the Macbook Air.
Where are iPhone backups stored Mac OS?
Backups of your iPhone are kept on your Mac computer using macOS Big Sur. Backups may be discovered in the /Library/Application Support/MobileSync/Backup folder, which can be accessed in Library > Application Support > MobileSync.
As a general rule, the most recent backup will be displayed first, followed by newer backups. You may also browse previous backups by sorting the list by date generated or date changed.
When you’ve found the backup you wish to use, double-click it to begin restoring your data. If you’d want to delete an old iPhone backup from Big Sur, right-click on the file and choose “Move to Trash”. Make careful not to erase any of your existing iPhone data since it is required for upgrading and syncing with other Apple devices.
How do I automatically sync photos from iPhone to Mac?
Syncing photos from your iPhone to your Mac automatically is a terrific way to keep all of your favorite photos and movies backed up and secure. Apple, thankfully, has made it easy for iPhone users to sync their photos with Big Sur on their Macbook Air.
Open the Photos app on both your iPhone and Macbook Air to begin the auto-sync process. Select “Preferences” from the menu on the Macbook Air, and then tick the box next to “iCloud Photos” at the top. This will give you access to any photos or videos saved on your iCloud account. Go to “Settings > Photos & Camera” on your iPhone and enable iCloud Photo Library and any other choices you wish, such as optimizing device storage. When you shoot new photos or movies with your iPhone, they will be instantly synced to your Macbook Air.
How do I download pictures from my iPhone to my Mac 2021?
With the correct tools, downloading photos from your iPhone to your Mac may be an easy and uncomplicated procedure. With Big Sur, Apple’s newest Mac operating system, you can now transfer photos and movies across your devices using the built-in Photos app.
To begin, ensure that your iPhone can connect to your Mac through a lightning connector or iCloud Drive. After connecting, launch the Photos app on your Mac and click “Import” from the menu bar at the top of the screen. You’ll then be shown all of the photos on your iPhone that are accessible for transfer. Choose which ones you wish to download, or check all of them if you choose. When you’re finished, click ‘Import Selected‘ at the bottom of the screen and wait for them to download into your computer.
When the process is finished, you can see all of your imported photos in their own folder under Photos, where you can also edit and share them as desired.
How do I AirDrop photos from my iPhone to my Mac 2021?
AirDrop is a terrific method to quickly and conveniently transfer photos, movies, and other data from your iPhone to your Mac and other nearby AirDrop-enabled devices.
To utilize AirDrop with your Mac and iOS devices, make sure both are up to date with the newest versions of their respective operating systems. For example, if you’re using an iPhone 11 Pro with Big Sur, the most recent version of macOS, AirDrop will need an iPhone 11 running iOS 14 or later.
To AirDrop a picture from your iPhone to your Macbook, ensure that both devices are unlocked and Bluetooth is turned on. Open the Photos app on your iPhone, then pick the photos you wish to transfer. Tap the “Share” button in the lower left corner of the screen and then pick AirDrop. Tap your Mac when it appears in the list of possibilities; AirDrop will now send it across.
How do I backup my iPhone to My computer 2021?
Backing up your iPhone to your computer is an excellent method to guarantee that all of your contacts, photos, movies, and other vital data are securely protected in the case of an unanticipated problem. Fortunately, regardless of the sort of computer you’re using, it’s an easy procedure.
The approach is same for Apple customers running Big Sur on their Macbook Air. Simply connect your iPhone to your Macbook via USB cord and launch Finder. Then, in the top-right corner of the window, click on the device icon and pick “Back Up Now” from the menu on the top-left side. The backup will begin automatically and may take some time depending on its size. When it’s completed, you’ll be able to access all of your backed-up data in iTunes or the Finder by going to File > Devices > Backup.
Why wont my computer let me backup my iPhone?
There are a few things you should look at first if you’re experiencing problems backing up your iPhone to a Macbook Air using Big Sur.
- First, ensure that the most recent version of iTunes is loaded on your Macbook and that “Trust This Computer” is activated on your iPhone.
- Next, make sure your phone is on the same Wireless Network as your Macbook Air.
- Finally, examine the device for any temporary app data that may interfere with the backup process.
If none of these methods work, there might be a problem with the iOS software or a hardware malfunction in the iPhone itself. For more help, you may need to contact Apple Support or bring your phone into an Apple Store.
Why can I not backup my iPhone?
The difficulty to backup your iPhone to a Macbook Air with Big Sur is frequently caused by a combination of issues. The first possibility is that you are not using the most recent version of Apple’s macOS operating system. Big Sur is necessary for backups to function correctly, so if you don’t already have it, upgrade your Mac to the most recent version.
Another possibility is that you’ve ran out of storage space on your MacBook Air. To back up your iPhone, you’ll need enough free space on your computer to store a whole copy of all of your iPhone’s data. If this isn’t an option, consider freeing up storage space by eliminating outdated files and applications or moving them to an external hard drive or cloud storage.
Finally, make sure iCloud backup is enabled in Settings > iCloud > Backup on your iPhone and iCloud Drive is activated in System Preferences > iCloud on your MacBook Air. If you have these options enabled and are still unable to backup, consider rebooting both devices before trying again.
Can I backup iPhone without iTunes?
You can backup your iPhone without using iTunes. Apple just released iOS 12 with a new feature that enables you to wirelessly backup your iPhone to iCloud rather than using iTunes. Simply connect your iPhone to a Wi-Fi network, launch the Settings app, then tap on your user profile at the top of the screen. Tap iCloud” and then “Back Up Now” to begin the backup procedure.
Another option for backing up your device is to use Apple’s Time Machine program, which is available on Mac OS X 10.6 or later. By attaching an external hard drive or other storage device to your Macbook Air with Big Sur installed, you may build a complete system backup of all of your information, including photos and music. Once connected and configured inside Time Machine settings, it will continuously operate in the background, automatically backing up any changes made to files on your computer – no need to plug it in manually as with iTunes.
Can I backup my iPhone to my computer instead of iCloud?
You may backup your iPhone to your PC rather than iCloud. Apple’s Big Sur update introduces a new method for backing up all of your crucial iPhone data: iTunes or the Finder on Mac. This gives consumers an alternative to the iCloud remote storage system, which may be sluggish and error-prone. Furthermore, backing up on a local device means that restoring an earlier version of your data is just a few clicks away if the need arises.
To backup your iPhone to a Macbook Air with Big Sur, connect your iPhone and Macbook Air via USB connection. Once connected, launch the Finder program from the dock and choose “Backup Now” from the File menu or the choices on the left-hand sidebar. You will then be able to choose between Incremental Backup or Copy Backup as the method for saving your files—both are secure solutions, but will take various lengths of time depending on how much data has to be backed up and if current backups need to be transferred over.
How do I backup my iPhone to my Mac wirelessly 2020?
The method of backing up your iPhone to a Macbook Air using Big Sur is quite straightforward. To begin, ensure that your iPhone and Macbook are both linked to the same Wi-Fi network. It’s also a good idea to have the most current version of iOS loaded on your iPhone.
Once you’ve confirmed that you’re on the same network, run iTunes on your Macbook and connect your iPhone. In iTunes, go to ‘Preferences’ and then ‘Devices’. In the ‘Devices’ section, you should see your iPhone listed. Choose ‘Back Up Now’ from the dropdown menu that displays.
Depending on how much data is kept on your phone, the backup process may take several minutes or more to complete. When finished, all of your photos, music, applications, contacts, settings, and so on will be securely backed up onto your Macbook.
How do I backup my iPhone without iCloud?
You can backup your iPhone straight to your Macbook if you don’t want to utilize iCloud. Simply connect your Macbook Air to Big Sur and your iPhone to a USB cord to do this. Once the two are linked, open the Finder window on your Macbook and choose “Back Up Now” from the left sidebar menu. The backup procedure will begin immediately and should just take a few minutes.
When finished, you’ll have an identical replica of your iPhone on your MacBook. This implies that the computer will be backed up with all of its information, settings, programs, and photos. It is critical to know that iCloud backups are saved in the cloud rather than on devices such as MacBooks or iPhones. Using this backup technique provides you with an extra copy of all information that can be viewed without the requirement for an Internet connection or access to iCloud servers.
How long does it take to backup iPhone to Mac?
Big Sur makes it simple to backup your iPhone to your Macbook Air. Once connected, your gadget will begin backing up to your PC. In general, the time it takes to backup your iPhone to Mac is determined on the quantity of data on your phone. Depending on the size of the backup, it might take anything from a few minutes to a few hours.
If you have a big library collection on your phone, the time it takes to sync media files and photos may be longer. Furthermore, backing up numerous devices at once, such as an iPad and an Apple Watch, might lengthen the total backup process. Keep the USB cord attached until the backup status in Finder or iTunes indicates complete.
How do I change the location of my iPhone backup on Mac Big Sur?
It’s simple and uncomplicated to change the location of your iPhone backup on Mac Big Sur. To begin, run the Finder software on your Mac computer. In the menu bar, select Go and then Go to Folder.
In the box that displays, type /Library/Application Support/MobileSync/Backup and hit enter. This will bring up a window with backup files for all of your linked iOS devices, including your iPhone.
To change the location of an iOS device’s backup, choose its folder in this window and drag it to a different place on your Mac computer. After that, restart iTunes so that it can identify the new backup folder’s changed location;. If you do not reset it, iTunes will continue to use the previous backup route.
Does iTunes still exist on Mac?
Yes, iTunes is still available on Mac. Although iTunes is now integrated into the Music app, Mac users may still use it to backup their iPhones. You may back up your iPhone on a Mac running macOS Big Sur by using either the Finder or the Music app.
Plug your iPhone into your Macbook Air and launch the Finder. Pick Devices from the sidebar, then select your iPhone from the list of linked devices. Click “Back Up Now” on the right side of the window and follow any prompts to finish the backup procedure.
You may also backup your smartphone using the Music app. Launch the Music app on your Mac and connect your device through a USB cord. The device will display in the sidebar, and you may click “Back Up Now” to begin a backup process for any material saved on it, such as music, films, and photos.
Does iPhone backup include photos?
The answer is yes to the inquiry “Does iPhone backup contain photos?”.
When you backup your iPhone to your Macbook Air using Big Sur, it includes all of the information, applications, and settings on your device, as well as any photos you may have taken. Photos are saved up to iCloud as part of the backup process; but if you want to preserve a physical copy of your photos on Big Sur, you can use Time Machine to create a version of your iPhone backup especially for photos. This will enable you to readily retrieve and see these photos in the event that they are accidentally erased from your smartphone or iCloud.
Why cant I transfer Photos from iPhone to Mac?
Transferring photos from your iPhone to your Macbook Air using Big Sur may seem to be a difficult task, but it does not have to be. You’ll need to utilize the Photos program on your computer to transfer photos from your iPhone to your Macbook Air.
To begin, launch the Photos app on your Macbook Air and choose “Import” from the File menu. Then, as the import source, pick “iPhone” and click OK. Go to Settings > Photos > iCloud Photos on your iPhone and make sure that iCloud Photos is switched on. This will enable photos shot with your iPhone to sync with iCloud and be automatically backed up in the background if you have adequate storage space on iCloud. Finally, use a USB cord to connect your iPhone and approve it when required. Select the sort of photos or films you want to transfer, such as All Photos or Videos, and then click Import Selected to have them moved from your iPhone to your Macbook Air in no time.
How do I sync Photos from my iPhone to my Mac wirelessly?
Wirelessly syncing photos from your iPhone to your Mac is a terrific method to keep your photos secure and backed up. This approach has been considerably simpler with the debut of Apple’s Big Sur.
To begin, check that both devices are linked to the same WiFi network. Then, on your iPhone, open the Settings app and choose “Photos” from the list at the bottom of the page. Finally, enable “iCloud Photos” and then choose “Download and Keep Originals” to save all iPhone photos in iCloud Drive rather than a local folder on your Macbook Air.
As long as you are connected to the same WiFi network, Photos will automatically sync from your iPhone to iCloud and then from iCloud to Big Sur.
How do I automatically sync Photos from iPhone to Mac wirelessly?
It’s simple to back up your iPhone using a Macbook Air running Big Sur. You may configure an automatic wireless sync of photos from your iPhone to your Macbook Air. You must have iCloud Photos activated on your iPhone and the “Download and Keep Originals” option enabled.
To activate iCloud Photos on the Macbook Air, launch the Apple Photos app. When you activate these settings, all photos shot with your iPhone will be wirelessly transferred to Apple Photos on your Macbook Air.
You may also manually sync photos by connecting your device to iTunes or Finder via USB connection. This will allow you to manually transfer any existing photos on your iPhone into Apple Photos on your Macbook Air.
What is the easiest way to transfer photos from iPhone to Mac?
The Photos app in macOS is the simplest method to transfer photos from an iPhone to a Mac. The following stages may be completed fast and easily:
- Launch the Photos program on your Mac and click Preferences “from your screen’s menu bar.
- In the resulting window, pick iCloud “from the list of choices on the left, and then check the box next to ‘iCloud Photos’.
- Connect your iPhone to your Mac using a USB or Lightning connection, and then press Trust “when you are asked to provide access to your device.
- Select Import All New Items when asked “and wait for all of your iPhone’s photos to be transferred to your Mac.
- Once finished, you can locate all of your photos in your Mac’s Photos library, as well as any cloud services you’ve enabled in Preferences, such as iCloud Photo Library or Google Photos.
This approach allows you to easily transfer all of your photos and movies from an iPhone to a Mac without the need for any extra software or services, which is ideal for those looking for a straightforward solution.
How do I transfer my photos on my iPhone to my computer?
Using Big Sur to transfer photos from an iPhone to a Macbook Air is simple and fast. To begin, connect your iPhone to your Macbook Air through the proper charging cord. Whether your iPhone asks you if you want to trust this computer, choose “Trust”.
Then, on your Macbook Air, launch the Images program. It will detect your iPhone and show any photographs that are saved on it. Then, choose the photographs you wish to transfer and press the Import “button”. The photographs will display in the correct library or album in the Photos app on your Macbook Air after imported. You can manage, edit, or remove these photos from here.
This procedure is comparable for other Apple computer models such as iMacs and MacBook Pros, as well as iPhones running various operating systems like as iOS 13 or 14.
How can I see my iPhone photos on my Mac in Finder?
If you’ve just upgraded your Mac to Big Sur and want to see your iPhone photos in Finder, you’ve come to the perfect spot. Apple’s Big Sur update makes it simpler than ever to view your photos on a Mac. All you need is your iPhone’s USB cord and a few mouse clicks in Finder.
To begin, connect your iPhone to your Mac via USB cord. Once connected, launch Finder by clicking its dock icon. When the Finder window is open, pick “iPhone” from the left sidebar menu under “Devices” and then click “Photos” in the top right corner of the Finder window. This will show you all of the photos on your iPhone that have been backed up to iCloud.
You may now choose to view all or individual photos on your Mac or copy them over for safekeeping by dragging them into a folder of your choosing on your Mac computer:
- View all photos on your Mac
- View individual photos on your Mac
- Copy photos over for safekeeping
Can you AirDrop all Photos from iPhone to Mac?
AirDrop is a strong but easy method to transfer photos from your iPhone to your Macbook Air. To utilize AirDrop, both devices must be connected to the same Wi-Fi network. Your iPhone and Mac must also have Bluetooth enabled.
Open the Photos app on your iPhone after both devices are connected and turned on. Then, in the bottom left corner of the screen, hit the “Share” icon. After that, choose the photos you want to transfer and hit the “Share” button in the upper right corner of the screen once again.
Finally, click “AirDrop” from the onscreen menu and select which Macbook Air you wish to transfer the photos to. Your chosen photos have now been uploaded to your Macbook Air.
Why cant my phone AirDrop to my Mac?
In most cases, the inability to AirDrop from an iPhone to a Mac is caused by one of numerous difficulties. To begin, ensure that both devices are logged in with the same Apple ID and that Bluetooth and Wi-Fi are both turned on. Then, make sure the AirDrop is visible in the Finder or AirDrop window on the Mac.
If you’ve followed all of these procedures and AirDrop still doesn’t function, there might be a problem with your Mac. One possible remedy is to restart your Macbook and try again. If this does not resolve the issue, you may need to reset your network settings or check for software upgrades. Furthermore, if your network has certain firewall settings activated, it may be essential to whitelist some services in order for AirDrop to connect effectively between two devices.
Can you AirDrop all your Photos at once?
AirDrop is an excellent method to transfer photos from one Apple device to another. You can use AirDrop to exchange photos, movies, documents, and other files with nearby Apple devices. The good news is that AirDrop allows you to transmit your complete picture collection at once.
To choose all of your photos on an iPhone, open the Photos app, touch Select in the top right corner of the screen, or squeeze two fingers together on an iPad. Then, in the bottom left corner of the screen, touch Share and choose AirDrop as your method of sharing. You will then be asked to pick a nearby recipient device. Once you’ve chosen a device, all of your photos will be delivered in a single batch using AirDrop. And presto, all of your photos have been air-dropped.
Checkout this video: